

Adding Products
Adding a new product in EasyStore allows you to introduce and showcase your products to potential customers.
To add a new product in EasyStore, go to the Joomla backend Dashboard > Components > EasyStore > Products and click on + New.
Follow the steps below to seamlessly incorporate a new product into your online store's inventory.
Product Details
- Title: Enter the product's title, which will be displayed to customers as the product's name.
- Alias: The alias is a part of the product's URL. It will be automatically created.
- Description: Provide a thorough and engaging description of the product. This description will help customers understand the product's features, benefits, and unique qualities.
Product Images
Upload appealing images of the product by clicking “Add Images". These images will be prominently displayed on the product's page and in product listings, influencing customers' purchasing decisions. We also added a video upload ability to the product gallery.
Pricing

The Pricing settings are where you configure the base cost of the product, as well as additional and optional information such as discount price and cost per unit. The customizable settings include:
Regular Price: Set the base price of the product.
Discount Price: Enable the option to set a discounted price. The price can be set based on percentage (%) or currency ($). This discounted price is deducted from the Regular Price. For example, when your product’s regular price is $59.99, and you set a discount price to 5% or $3, the final price will be displayed as $56.99.
Charge Tax: Enable this setting to impose taxation on the product.
Base Unit: When enabled in General Settings, you can show the base price per unit of measurement, such as kilograms (kg), grams (g), pounds (lb), or ounces (oz).
To display the Base Unit Price on your page:
- Go to SP Page Builder > EasyStore > Single.
- Add the Base Price addon to a section on the page, positioning it either before or after the Price addon as your design dictates.
For instance, you are selling a product for $59.99 and each unit weighs 287 grams. So, on your product page, it will display Base Price as $59.99/287 gm.
Cost Per Unit: If enabled in General Settings, you can set the cost per unit for every product. This will automatically calculate and show profit and margin based on the Regular Price you have set earlier.
For example, if a product’s regular price is $399.00, then by setting the cost per unit to $300, you will see the profit automatically calculated and set to $99.00, and the profit margin as 24.81%.
Note: The Cost Per Unit is only visible to the administrator or seller while setting up the product. Customers will not be able to see the cost or profit on the store page.
Inventory

Configure the inventory settings, such as:
Shipping Package: If you have created any shipping boxes in the Shipping Settings, then you can select a shipping box from the dropdown menu.
Weight: The weight of the product can be set in kilograms (kg), grams (g), pounds (lb), or ounces (oz).
SKU: Enter a Stock Keeping Unit for the product.
GTIN, UPC, EAN, or ISBN: Set an official GTIN (Global Trade Item Number), UPC (Universal Product Code), EAN (European Article Number/International Article Number), or ISBN (International Standard Book Number). These unique, standardized product codes facilitate smoother supply chain operations, inventory tracking, and sales transactions in worldwide e-commerce and retail.
Continue selling when out of stock or before it’s released: Selecting this option will make the product purchasable by users even if it is out of stock or yet to be released.
Sell Quantity: By selecting this feature, you can establish a minimum and maximum number of units available for purchase for a specific product. For example, if you establish a minimum sale of 2 units and a maximum of 10, a customer wishing to purchase that product will be restricted to buying between 2 and 10 items.
Select this option to predefine a minimum and maximum order quantity for this product.

Min Sell Qty: The minimum units of the product that must be purchased.
Max Sell Qty: The maximum units of the product that can be purchased.
Track Quantity: Selecting this option will allow you to set a stock quantity of the product, which can be tracked based on sales.
Stock Status: Set whether the product is in or out of stock. If the "Track Quantity" setting is enabled, this option will automatically change to "Stock Quantity." Instead of dropdown options, you'll see a field to enter the number of items in stock.
Variations

Product variations is a crucial feature in eCommerce that allows you to offer different options for a single product, such as size, color, or material. These variations enable customers to choose the specific version of a product that best suits their preferences or needs.
If your product has variations, you can configure those settings here by clicking on Add Variations.
Note: If Variations are created, then the Pricing and Inventory sections are removed and replaced by the Product Variants section, where you will be able to customize pricing and inventory settings of each product variant.
After choosing the variation type between a List or Color, configure the following settings:

Show on product page as: Choose how you want the product options to be displayed on the product page. Customers will use these options to select their preferred variation of the product. You can choose between two display formats:
- List: Options will be displayed as a list.
- Color: If your variations represent different colors, this option will display color swatches for customers to choose from.
Variation name: Enter the name of the attribute for which you're creating variations. For example, you could enter "Size" as the variation name if your product comes in different sizes. Similarly, if your variations represent materials, you could enter "Material."
Variation Values: You can create new values, as well as edit or delete existing ones. For example, you can add a variation type called “Material”, and after that, set values such as “Stainless Steel”, “Ceramic”, “Glass”, “Silicone”, and so on.
For each variation, add the possible values or options that customers can choose from. These values will be displayed as options on the product page.
To display color, click on the circle a color picker feature that allows customers to:
- Enter a hex code (e.g., #FF5733).
- Enter an RGBA code (e.g., rgba(255, 87, 51, 0.8)).
- Pick a color from a library
Afterwards, you will be able to manage all of the variations under the Product Variants section.

You can set the Price of each variation value, as well as filter these values based on variation name.
Click the Edit Variants button to be redirected to the “Bulk Edit” page, where you can define several Pricing and Inventory settings for each variant, such as:
- Price: Adjust the price of the variant, if necessary. This allows you to offer different pricing based on the selected variation. Enter the prices of selected variants collectively, ensuring consistent and synchronized pricing adjustments.
- Discount: Enter the discount price of each variant.
- Charge Tax: Select this option to charge taxes for this product.
- Shipping Package: Choose the shipping boxes for the variants.
- Weight: Specify the weight of the variant. This is particularly useful for accurate shipping calculations. Enter the weights of multiple variants simultaneously for precise shipping calculations.
- SKU: Assign a unique identifier (SKU) to the variant. SKUs help with internal tracking and management. Automatically generate unique SKUs for variants that lack an SKU. This simplifies tracking and inventory management.
- GTIN, UPC, EAN, or ISBN: Set the product codes for each variant.
- Track Quantity: Enter the actual quantity of the variant in your inventory. This value represents the number of units available for purchase.
- Availability: Enter the inventory values for multiple variants at once, ensuring accurate stock levels across your product range.
- Visibility: Toggle the visibility to control whether customers can currently see this variant. This can be useful if you want to temporarily hide specific variations.

Note: The Base Unit and Cost Per Unit settings are not available in the case of Variations.
In EasyStore, you can add unlimited product variations. But do keep in mind, that if you exceed 400 combinations, Joomla's default post limit (typically 500) might be reached, causing various issues like product variations not saving properly.
To avoid the issue, navigate to System > Global Configuration > Server. Look for the "Database Post Limit" setting and increase it to a value exceeding your expected number of combinations (e.g., 1000 if you anticipate having more than 400 combinations). Or, if you have access to your server's php.ini file, you can modify the "max_input_vars" or "post_max_size" value.
Product Options
To add Cross-sell or Upsell Products, follow these steps:
- While adding or editing a product, scroll down to the Product Option section.
- Click on Add More Products beside the appropriate option.
- Filter products by “Categories”, “Collections”, and “Brands”, as well as use the search bar at the top to directly search for the product by its name.
- Select the products you wish to cross-sell or upsell by checking the boxes.
Click Add to finalize.
Additional Data (Optional)
If the product has specific specifications, such as technical details or features, add them by clicking "Add Data." This information enhances customers' understanding of the product.
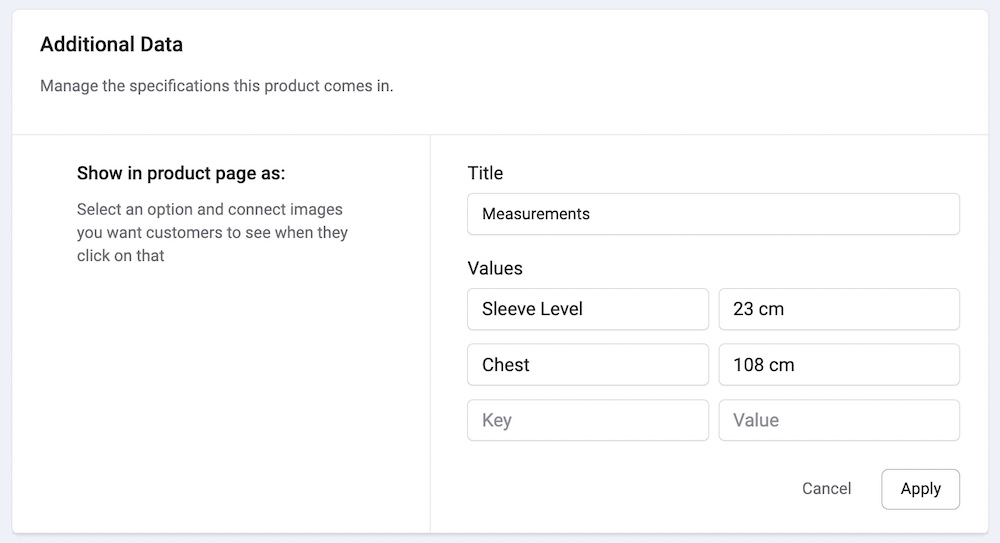
Title: Enter a title for the specification you want to define. This title will help customers understand the attribute you're describing.
Key: Optionally, you can provide a key to categorize and organize the specifications. This can be useful when you have multiple specifications to manage.
Values: Add the specific values for the specification. These values will be displayed as options for customers to view.
Basic Information
Status: Choose the publication status of the product. Select "Published" to make the product visible on your store or choose other options if necessary.
Category: Assign the product to a category. Choose an existing category from the dropdown list or create a new one.
Featured: Choose "Yes" to feature this product on the shop page.
Regular Price: Enter the regular price of the product in the specified currency. This is the base price before any discounts or sale prices are applied.
On Sale: Toggle this option to indicate whether the product is on sale. If "Yes" is selected, you can configure sale-related details.
- Discount Type: Choose the type of discount you want to apply to the product. Select either "Percentage" or another option if applicable.
- Discount Value: Enter the value of the discount. This could be a percentage or another value based on the chosen discount type.
Tracking Inventory: Toggle this option to enable inventory tracking for the product.
When enabled, you need to specify the quantity.
- Quantity: Enter the initial quantity of the product available in your inventory.
When disabled, you need to specify if the product is in stock or not.
- Inventory Status: Choose the current inventory status of the product. Select either "In Stock" or "Out of Stock" based on the product's availability.
Keep Selling Out of Stock: Toggle this option if you want to continue selling the product even when it's out of stock.
SKU (Stock Keeping Unit): Assign a unique SKU to identify the product. SKUs aid in internal tracking and inventory management.
Product Tags: Assign relevant tags to the product. These tags help organize products and assist customers in finding what they're looking for.
Weight: Enter the weight of the product. The unit of measurement adheres to your chosen weight unit in EasyStore Settings.
Dimension: Enter the dimensions of the product. This includes the length, width, and height. The unit of measurement adheres to your chosen Dimension unit in EasyStore Settings.
Access: Choose the access level for the product. Select "Public" to make the product accessible to all users.
Meta Title: Add a meta title that describes the content of your product page. The title should include keywords while ideally being 50-60 characters long.
Meta Description: Add a brief summary of your product that appears below the meta title in search engine results. This description should provide a clear overview of what the product is and should ideally be 150-160 characters to ensure the full description is displayed in search results.
Keywords: Keywords are specific words or phrases related to your product that help search engines understand what your page is about. Including relevant keywords in this field can improve your product’s visibility in search results.
Robots: The Robots directive allows you to control how search engine crawlers index your product page.
- Use Global: Instruct the web robots to follow the globally specified directives.
- Index, Follow: Instruct the web robots to index your product's page and follow links on the page.
- Noindex, Follow: Instruct the web robots not to index your product's page but to follow the links on the page.
- Index, Nofollow: Instruct the web crawlers to index your product's page but not to follow the links on the page.
- NoIndex, Nofollow: Instruct the web crawlers to refrain from indexing the product page and to avoid following any links present on that page.